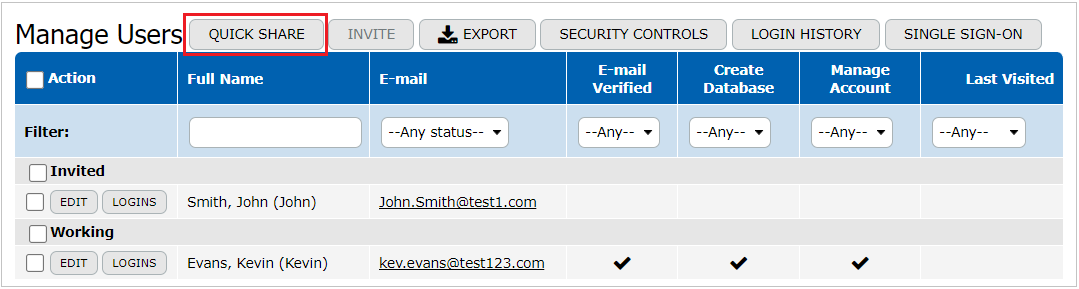
Manage Users
This functionality is available as part of the Enterprise Edition and is not allowed for Starter and Team Editions.
When you click on the "All Users" tab, the "Manage Users" page will open. As an administrator, you can use this page to share databases, manage user access, edit user profiles, and configure security control settings.

Additionally, there are filters at the top of the user list. An administrator can enter words or letters in the "Full Name" field to find a user by their name or screen name, as indicated in brackets.
Users can also be filtered by the following criteria:
- Statuses listed in the "E-mail" dropdown
- Yes/No options can be chosen in the "E-mail Verified," "Create Database," and "Manage Account" dropdowns
- The "Last Visited" column offers choices of "Accessed" or "Never"

Editing a User
Click Edit next to the user you wish to modify in the list to change their profile information.

The "Edit User Information" form includes the following options:

- First Name
- This field displays the user’s first name as registered. Administrators can edit this value.
- Last Name
- This field displays the user’s last name as registered. Administrators can edit this value.
- Administrators can change the user’s email in the "E-mail" field.
- E-mail Verified
- When the "Verified" checkbox is checked, it indicates that the user has verified their email address.
- Screen Name
- Administrators can enter a screen name for the user.
- Status
- Use this dropdown menu to set the user’s status. You can choose from the following statuses:
- Invited: When the user has been invited to the database.
- Working: When an invited user registers and enters the database, their status changes to "Working".
- Disabled: If an administrator wants to restrict a user’s access without deleting them from the database, for example, due to tasks assigned to that user, the "Disabled" status can be set. This status restricts the user’s access to the databases.
- Password
- Administrators can change a user’s password by entering a new one in the "Password" field.
- Must Change Password
- If this checkbox is checked, the user will be prompted to change their password upon their next login.
Permissions

- Create Databases
- If the checkbox is ticked, the user can create new databases.
- Manage Account
- If the checkbox is ticked, the user can access the "Manage Account" tabs/pages and has access to the setup mode. As a result, this user can manage other users and databases. Frequently such user is an administrator who can fully manage users’ profiles and restrict the access to some databases for certain users.
- Allowed IPs
- Administrators can restrict the user access indicating a certain range of IPs for the user. For example, an administrator can enter a single address 192.168.0.1 or a range of addresses 192.168.0.1 - 192.168.0.14 or a subnet 192.168.0.1/29. In case you list two or more IPs, they have to be separated by a comma.
Preferences

- Language and Location
- Administrators can change the user’s chosen language and location preferences.
- Time Zone
- Administrators can change the user’s chosen time zone preference.
Logins
To review a user’s login history, click the Logins button.

The Logins button displays a detailed log of login-related activities, including password reset attempts, for a single user account.

Sharing Account
To share the Enterprise Edition account with users, click the Quick Share button.
After that, enter the users’ emails in the Quick Share form and click Save to add the users or Save & Invite if the added users should be invited immediately.

If you added users without an invitation, you can send invitations using the Invite button. You can invite any existing user displayed in the "All Users" list.
To invite users, select the checkboxes next to the necessary users and click the Invite button. Invitations containing their account URL will be sent to these users.

Security Controls

To define the password policy and control session settings for your company, click on the Security Controls button displayed on the "Manage Users" page.
As a result, the "Security Controls" form will be displayed.

- Minimal Password Length
- Administrators can set the required minimum password length for all users.
- Password Characters
- Administrators can specify password character requirements, such as:
- Any combination;
- Mix alpha and numerics.
- Password Expiration
- Set the "Password Expiration" period to 30 days, 60 days, 90 days, or 1 year. Users with the "Must Change Password" option enabled must renew their passwords when the password period expires.
- Enable password history
- The Enforce password history option in Password Policies allows for tracking users’ password change history to prevent them from repeatedly reusing the same password. When enabled, the system stores the last 10 passwords and does not allow users to reuse them.
- On failed logins
- You can activate the "Block user accounts after…" option and specify the number of unsuccessful login attempts. When a user exceeds this limit, domain administrators are notified by email, and a message is displayed to the user.
- Session Timeout
- Administrators can set the "Session Timeout" option to require users to sign in to the database again if the session timeout occurs.
Login History
To review the login history of all users, click on the Login History button.

As a result, you can see a detailed log of login-related activities, including password reset attempts.

Moreover, you can use the filters ("User/Login", "Status", and "Location") displayed at the top of the list to find the historical data you need.
Single Sign-On

The last button is Single Sign-On.
Using this button, you can configure Single Sign-On via a SAML 2.0 compatible identity provider (for example, Microsoft Active Directory Federation Services).
