Customizing Table Properties
Say you have created a lot of tables and want to mark out some of them or rename.
To customize properties of an existing table:
-
Click the
Setuplink in the top right corner of the window. -
Select the
Databasetab. -
From the setup menu select
Tables>Customize existing tables. -
Choose the necessary table from the list; click
Editin a corresponding row. -
Fill in the table properties that appear in a form.
General properties

- Singular Name
- A table name entered in this field is displayed in the Setup Mode as a headline, when you customize table objects like views, columns, documents, etc.

In the User Mode the Singular Name value is displayed on a record form as a header and in the New Record adding dropdown.

- Plural Name
- A table name entered in this field is shown as a tab name and in the list of tables displayed in the Setup Mode left menu.

In the User Mode the Plural Name value is displayed as a tab name.

- Name Column
- From the list select the column which values will be used to represent table records as a short text. For example, the "Full Name" formula-text column is chosen as the
Name Column. As a result, by default the Full Name value is displayed on the form title.

Also, by default, the Name Column value is displayed in the recycle bin:

Moreover, by default, the Name Column is chosen in the Record Picker settings. If in the default record picker the Custom Columns are specified, the values of these columns are displayed in a form title and in the recycle bin.
- Tab Color
- Click on the Color icon if you want to change a predefined table tab color to another one. Select a color on the palette opened in the new window. As a result, a table header and headers of all Table views created in this table will be colored.

Please note that the Tab colorization is applied to the User Mode only.
- Icon
- This option allows you to select icons for table headers (tabs). You have a choice of 900+ icons covering various subjects – actions, brands, file types, symbols, animals, and more. The Search box above will help you narrow down the list of choices.

The icon will appear to the left of the table name. Moreover, you can activate the Hide text option if the table name should be hidden in the User mode.
For example, this is the tab with the name and the icon:

This is the tab where the Hide text option is checked:

- Notes
- This field can hold any developer’s comments that need to be kept for this table. The comments will be visible in the Setup mode only.
Default Record Picker Options
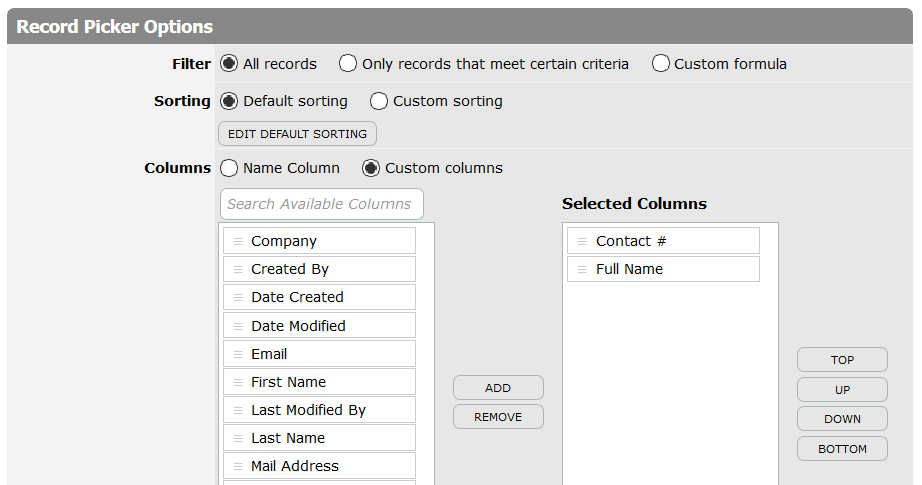
The Default Record Picker defines which record values are used as choices (abbreviated entries) to simplify record selection and make it intuitive for users. By default, the Name Column values are used as abbreviated entries.
When Custom Columns are selected, their values are displayed as a record title on the form and in the recycle bin listing.


Furthermore, the Default Record Picker options define how table records look and act in reference columns created in the other tables.
Search Options
This section controls whether the table is searchable by Search for Keywords and how search results are displayed.

- Allow Search
- Check this option to include the table in the
Search for Keywordsresults. By default, search is allowed. To exclude the table from search results, uncheck theAllow Searchcheckbox. This will prevent any search results from being displayed for the table. If no tables have theAllow Searchoption enabled, the system will hide theSearch for Keywordsfield. - Result
- If the
Allow Searchoption is checked, you can specify which columns will be included in the search results displayed bySearch for Keywords. You can choose from the following options:
-
All Columns with "Allow find": This default option displays all columns with the
Allow findproperty checked as search results. Note that the Allow find property is only available for physical text columns such as Text, Text-Multi-line, Phone, Email, Autonumber, Barcode, URL, and File-Attachment. Other column types, such as Number, Lookup, Summary, and Formula, do not include theAllow findoption and cannot be searched. -
Custom Columns: This option allows you to select specific columns and define their order for display as search results.
Advanced Properties
TeamDesk allows coloring for particular records or areas. The Row Colorization option is included in Table Properties and in View options. If you specify a row colorization formula in Table Properties, it will be applied to all views created in this table. In case you want to apply colorization in a certain view, just edit view settings and add formulas to the row colorization field.

If you want to apply a special colorization formula to certain rows in a table, mark the Row Colorization Formula checkbox.
The system will expand the Row Colorization section. Here you can insert colors, variables, functions, and operators into the formula.
For example, to highlight green all records that were added by the user sam.powter@gmail.com, insert the formula:
If([Created By] = ToUser("sam.powter@gmail.com"), "#54C254")
User Interface
Table properties include the User Interface section, which controls the appearance of the user interface.
You can configure user interface options at both the table and role levels.
To customize User Interface options for all roles for a particular table:
- Click the
Setuplink in the top-right corner of the window. - Select the table for which you want to modify User Interface properties.
- From the setup menu, select
Tables>Table properties. - Scroll down to the
User Interfacesection and press theEditbutton.
To customize User Interface options for all tables for a particular role:
- Click the
Setuplink in the top-right corner of the window. - Select the
Databasetab. - From the setup menu, select
Sharing / Roles>Define and manage roles. - Click on the desired role name, scroll down to the
User Interfacesection, and press theEditbutton.
The following buttons can be enabled or disabled separately for each role:
- Hide Tab: Removes the tab from the interface for users with the respective role.
- Hide New: Removes the
Newbutton used to add a new record for users with the respective role. - Hide Edit: Removes the
Editbutton used to edit a record for users with the respective role. - Hide Add Similar: This button simplifies record creation by copying data from the current record. Selecting the checkbox removes the
Add Similarbutton from the interface for users with the respective role. - Hide Print/Export/Send: Selecting the checkbox disables printing, exporting, or sending related records in the details table via email for users with the respective role.
- Show Prev/Next: Enables the
PreviousandNextbuttons for navigating through records in the list for users with the respective role. - Show Save and New: Displays the
Save and Newbutton on the new record creation form, allowing users with the respective role to save the current record and create another one. - Show Save and Next: Displays the
Save and Nextbutton when editing an existing record, allowing users with the respective role to save the current record and proceed to edit the next one in the list.
More details about the Previous, Next, Save and New, and Save and Next buttons can be found in the TeamDesk blog.

The ability to hide New and Edit buttons can be used when you want to prevent users from creating or editing records via the default interface and instead plan to manage records using workflow actions or custom buttons.
Additionally, it is possible to hide the Print/Export/Send buttons on views. While this does not fully protect data from being copied, hiding these buttons may help to complicate such actions.