Third-Party Accounts
Third-party accounts involve extracting the Call URL Authorization section into a separate entity.
Using the "Third-Party Accounts" functionality, you can set authorization types, usernames, passwords, and tokens, and then reuse the same account in multiple Call URL actions.
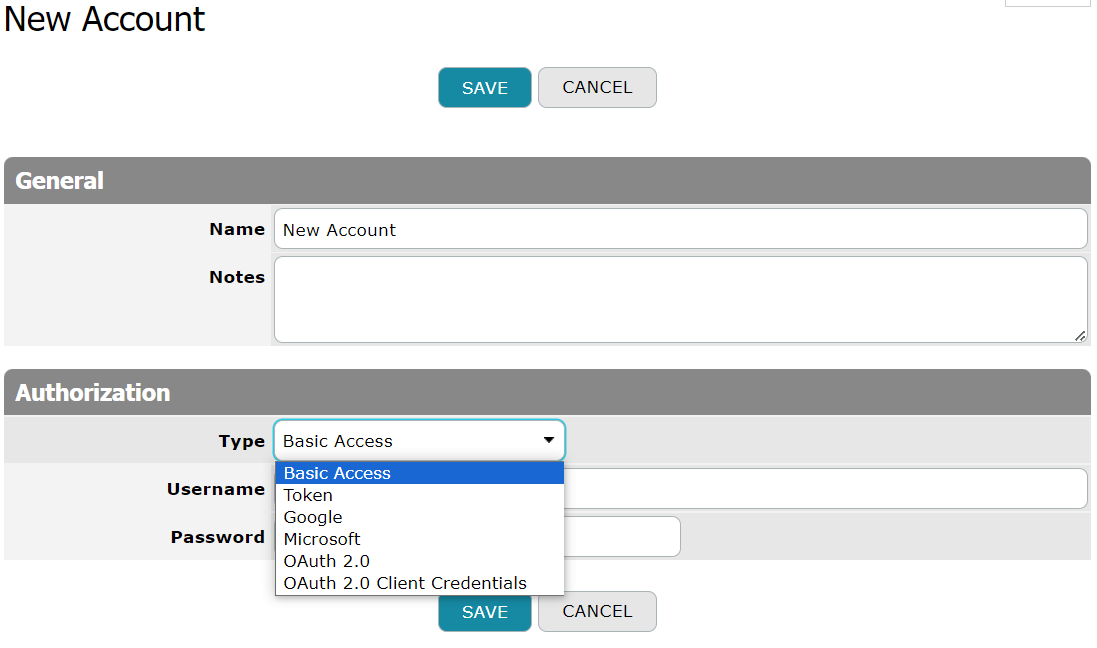
To create a new 3rd-Party Account, navigate to Setup > Database tab > Tools > 3rd-Party accounts, and click the New button.
As a result, you’ll see the New Account form.
- Name
- In the "Name" field, enter the name of the 3rd-Party Account.
- Notes
- The "Notes" field can hold any developer’s comments that need to be kept for this 3rd-Party Account. The comments will be visible only in the Setup mode.
- Type
- In the "Type" dropdown, you can choose an authorization type. The following types are available:
- Basic Access
- Token
- Microsoft
- OAuth 2.0
- OAuth 2.0 Client Credentials
Let`s check the options for each authorization type.
- Basic Access
- Use this type if API requires basic user/password authorization.
UsernameandPasswordmust be filled out for this authorization type.

- Token
- Token authorization is a method used to grant access to resources or services by using tokens. Instead of relying on direct user credentials, a token—usually a string of characters—serves as a temporary and secure means of granting access.

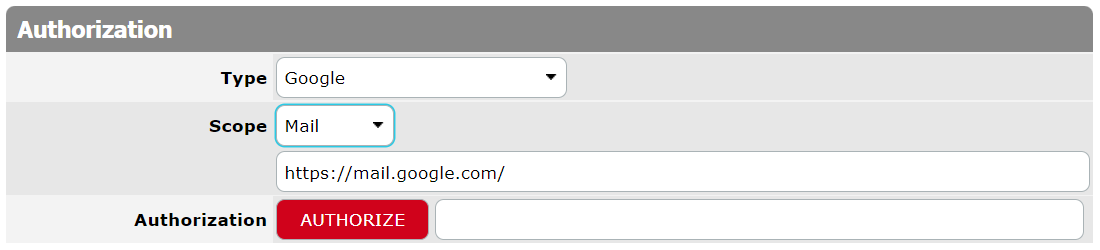
- For your convenience we’ve registered application with Google. All you need is to provide scope for API call.
Select one of the Scope options from the drop-down list:
- Other
- Calendar
- Drive
- Contacts
- Sheets
You can provide the scope for API call manually by typing it into the text box if needed or if it`s not available in the drop-down.
Once done, click Authorize, follow the steps to authorize in the third-party account, and the Authorization field will be populated automatically. You can change it manually in case of any errors or issues.
- Microsoft
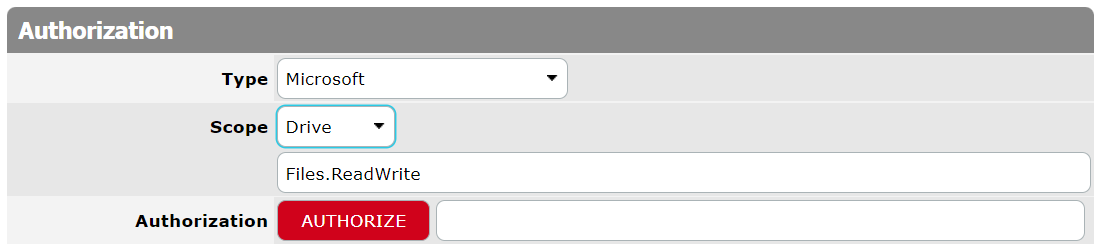
- For your convenience we’ve registered application with Microsoft. All you need is to provide scope for API call.
Select one of the Scope options from the drop-down list:
- Other
- Calendar
- Drive
- Contacts
- Notes
- Tasks
You can provide the scope for API call manually by typing it into the text box if needed or if it`s not available in the drop-down.
Once done, click Authorize, follow the steps to authorize in the third-party account, and the Authorization field will be populated automatically. You can change it manually in case of any errors or issues.
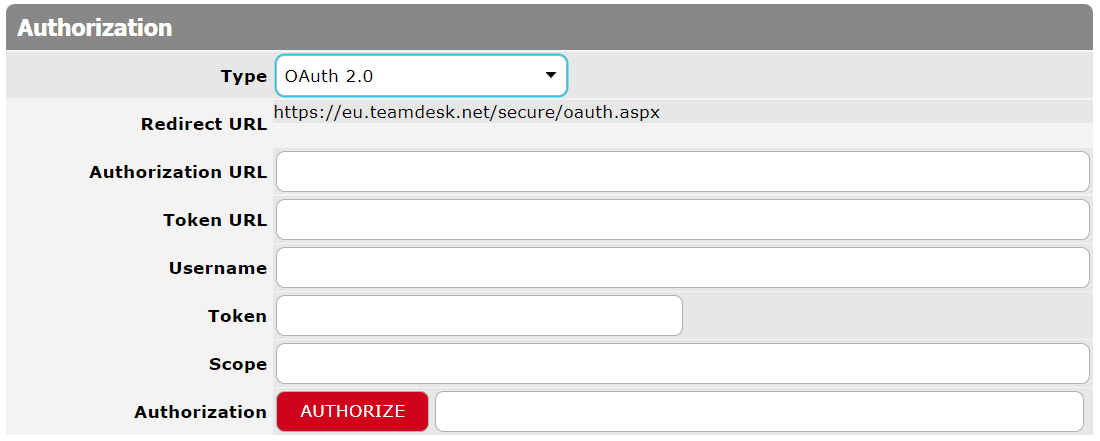
- OAuth 2.0
- OAuth 2.0 is an authorization framework that allows third-party applications to access user resources without exposing their credentials. It uses access tokens issued by an authorization server to grant limited access to resources on behalf of the user. This process enhances security by separating the user’s authentication from the application’s authorization.
If you need to authorize to another application that`s not available in the dropdown, you can establish the connection yourself. First you need to register application with service provider.
Besides the type the following information must be provided for such authorization: Authorization URL, Token URL, Username, Token, Scope.
Once done, click Authorize, follow the steps to authorize in the third-party account, and the Authorization field will be populated automatically. You can change it manually in case of any errors or issues.
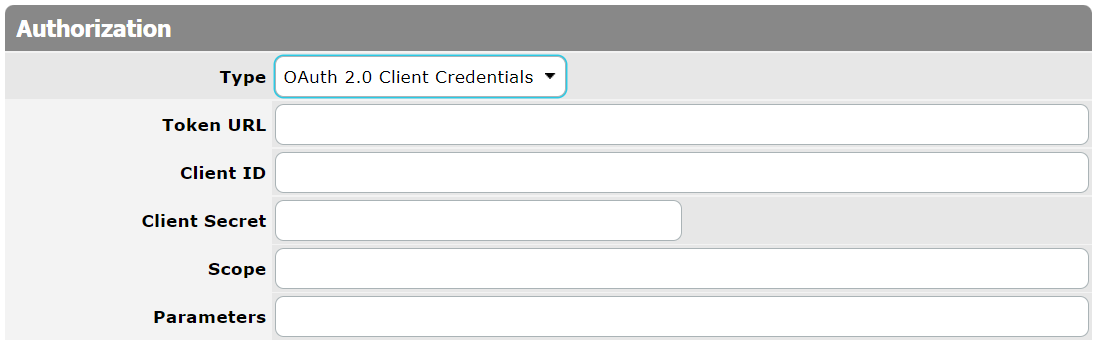
- OAuth 2.0 Client Credentials
- If the previous option does not work for the service you are trying to reach, you might use this one.
The information about which option to use must be found in the documentation of the service that you are trying to connect to.
Besides the type the following information must be provided for such authorization: Token URL, Client ID, Client Secret, Scope, Parameters.
The Google or Microsoft options in the Type dropdown are only available for the main TeamDesk domain. Other domains should use Generic OAuth v2 options.
The OAuth2 protocol requires an "app registration" part on the third-party site. You’ll obtain the Client ID and Secret values used further in the authorization process. An integral part of app registration is the "Redirect URL" – a page on TeamDesk that the third-party service calls back with authorization code. This page is
https://<yourdomain>/secure/oauth.aspx. Since the domain part is variable, we can’t register apps for all the variety of subdomains – you have to register an app for your own subdomain.
You can reuse the same 3rd-Party account in multiple Call URL actions. Moreover, a new 3rd-Party account can be created directly in a Call URL action form.
Example
Let’s consider Google Calendar synchronization. First, you subscribe your webhook to receive change notifications. The calendar then calls the webhook, and you should request the list of changes. For each event in the list, you get the event’s data. Finally, if you want to pause syncing, you should unsubscribe your webhook.
In total, you’d need a Webhook and four Call URL actions: Subscribe, List, Get, and Unsubscribe. All four require read-only API access to your calendar.
Now, suppose you’ve finished testing synchronization with your calendar and want to use a shared one, available through a different account. What do you need? You need to accurately change access credentials for each of the four actions. Forgetting to update one could disrupt synchronization.
For Basic authorization, you can store shared login and password into an application variable and pass it to the service using headers. The downside of this approach is that login credentials are stored in plain text. However, the variable approach won’t work for OAuth 2 protocol. It uses an access token with a limited lifetime that rotates periodically and requires special treatment baked into Call URL actions code.
The Solution: Third-Party Accounts
To address this, we’ve added the Third-party Accounts list at the database level. You can find it in Setup > Database tab > Tools > 3rd-party accounts link.

There, you can set authorization types, usernames, passwords, and tokens, and then reuse the same account in multiple actions. You can pick an existing account in the Call URL action’s interface if it’s suitable.

Or you can create a new account without having to leave the action UI.
We converted the authorization of existing Call URL actions to Third-party accounts, one account per action.